Positive-negative cut paper art looks simple until a student’s design refuses to counterchange. One shape needs to flip from dark to light as it crosses into the next section, and the kid has drawn something that just…won’t.
We start small. I demo simple counter-changing, then pass out counter-change worksheets, one per student at random, shaded with pencil only. After that we move to marker, two designs per sheet in any order. Students check their own work as they go: a star or smiley on the designs they think are correct, an X or frowny on the mistakes. It’s quick, and it gets them looking for their own mistakes.
Once they’ve had the resource booklet and some research and planning time, students do workups on four-fold manila. That’s where the sticky designs show up, so I give them four ways out:
(1) New design. Sometimes the honest answer is to start over. (2) Border. A border around the shape gives the value somewhere to switch. (3) Intersection. Run a line through the problem area so the shape crosses into a new section. (4) Erasing and Gestalt Closure. Take a piece out and let the eye fill in what’s missing.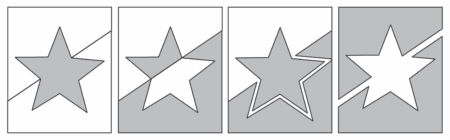
The design needs at least 8 pieces. From there it’s a primary drawing on 9×12 manila, and nobody gets colored paper until that drawing is approved. Approved students pick a color to transfer to. They can cut if they’re confident they can save the pieces, but no mounting yet. That waits until everyone gets the black backing page and glue and we’ve gone over assembly together.
Of course, the four fixes don’t save every design. Still, they turn “it doesn’t work” into a choice instead of a dead end.
The Positive/Negative Cut Paper Design resource is available at Cummins Supply.